DIY Mid-Century Style Beer Crate Side Table

Every once in a while one of my (many) project failures turns into an unexpected success.

I originally started out staining a smaller wooden crate in which I received some cheese I won (I know, I’m the luckiest girl alive) to make into a side table. All was going well until I tried to attach the hairpin legs that I ordered and found that their bases were too wide to even fit onto the box itself. Since all of my messier projects are done at my parents’, I scavenged around to find something else I could attach the legs to.

img_9875

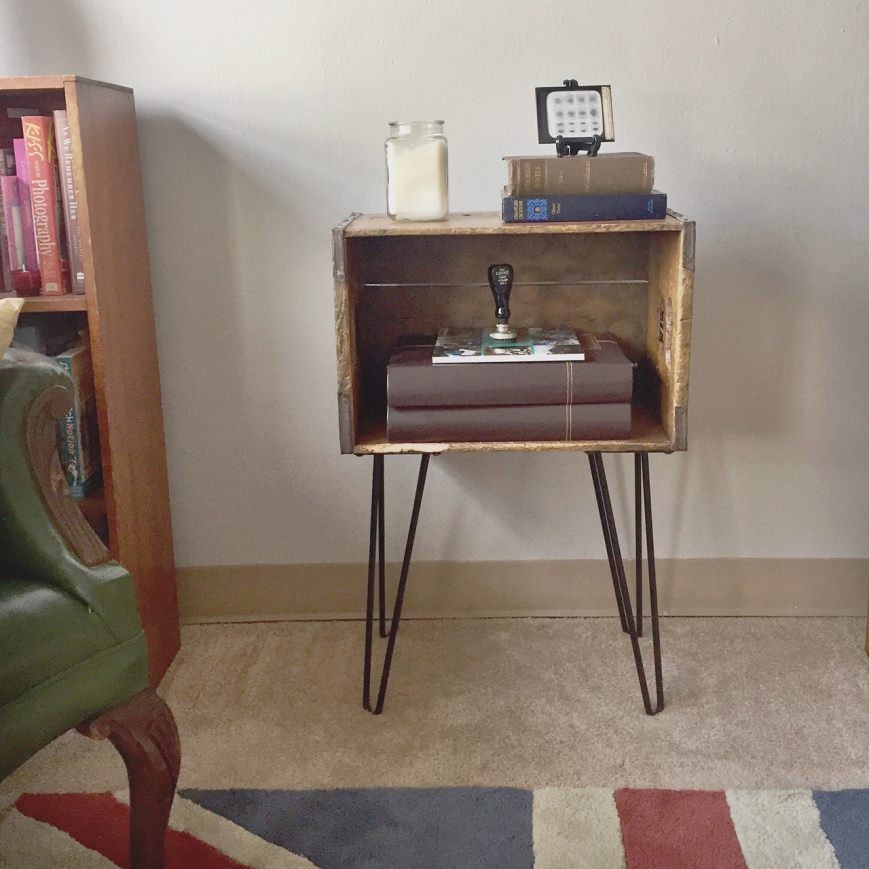
I remembered an old wooden Pabst Blue Ribbon crate that used to hold firewood at our house and dug it out of the garage. After dumping out the wood scraps and cleaning the dust off, it was the exact style I was looking for, right down to the “Blue Ribbon” stamp on the side and the circular bottle marks worn onto it—and, more importantly, the perfect size for attaching the hairpin legs!

img_9874

I gave the crate a cleaning and a couple of coats of stain. After shaving down the length of the screws so they wouldn’t poke through onto what would become the bottom shelf (another perk of doing projects at home since I don’t exactly have a sawzall in my apartment—thanks, Dad!), the legs attached easily and I had a new-old table! 

img_9873

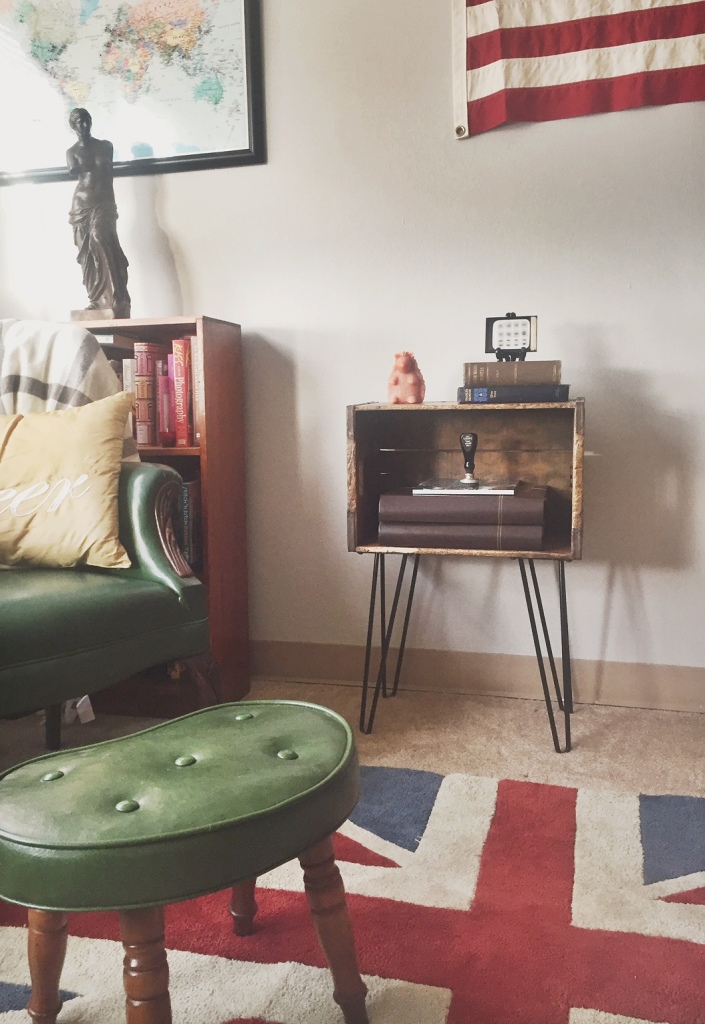
I absolutely love how this table turned out. From the size to the color to the beer theme, it was the perfect thing to use (and much better than the one I originally intended on using).

img_9870

It fits right into my apartment and is the perfect scale for a small space. I wasn’t sure what I would use it for, but it’s been working great to hold photo albums and assorted tchotchkes I want to display (like my antique mitochondria slide, duh).

img_9871

Stenciled Scotland Messenger Bag

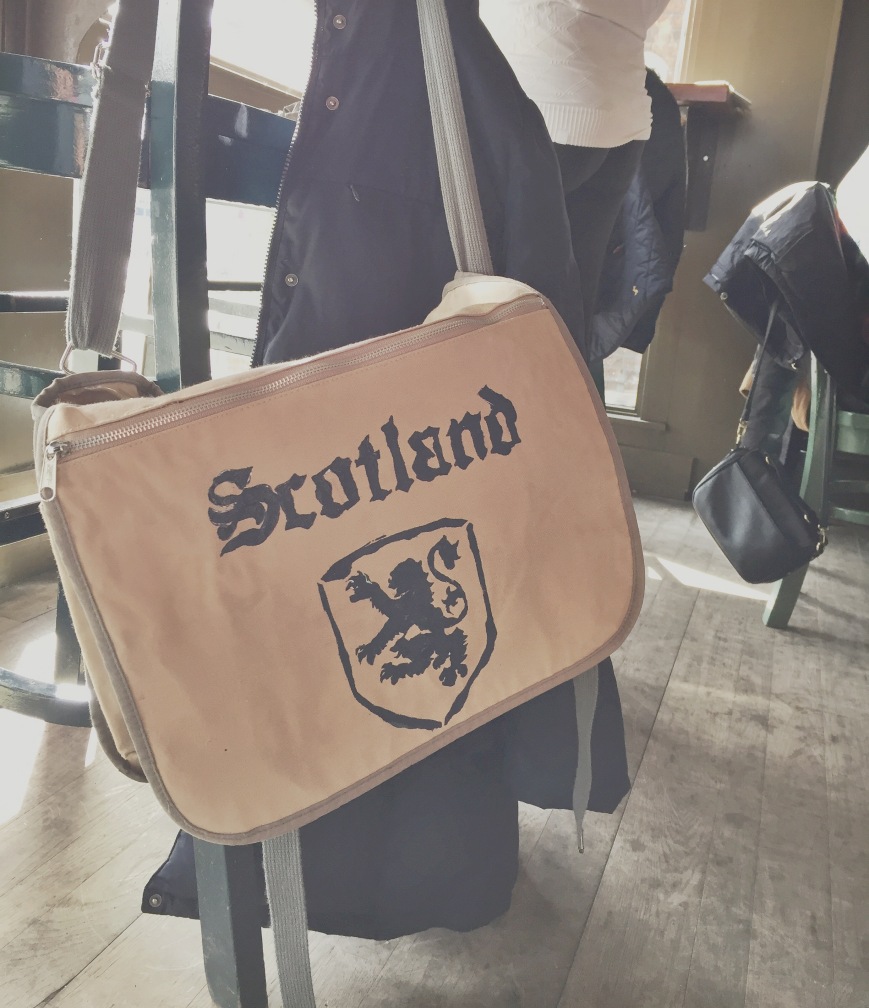
Have you ever wanted to stencil the name of a country you’ve never been to onto a thrift store messenger bag? I certainly have. So I did.

image2

Sunday morning in nowhere-near-Scotland vibes.

Like so many of my projects, this one has a long and storied past, but I’ll try to keep it succinct. I’m half Scottish and decided I needed to make a Scotland sweatshirt (I guess I forgot that the internet exists so that we don’t live like pilgrims making all the clothes we desire). I painstakingly made a stencil and stenciled it onto a sweatshirt and, don’t you know, it looked great. Then I washed and shrunk the sweatshirt so it no longer fit me. It was fun while it lasted. But I hung onto the stencil for a long time, just waiting for the perfect item on which to try again to fall into my hands. And then I found this canvas messenger bag at a thrift store. And THEN a few years went by and here we are today.

image4

The blank canvas (bag), perfect for carrying around heather and haggis.

So that’s what I started with. Actually, I should back up. I started with a printout of a crest and the word “Scotland” in the font I wanted, a blank sheet of stencil material, and an Exacto knife. That’s how the stencil came to be. It took forever, by the way.

I measured where I wanted to put the stencil so it was centered on the front of the bag and pinned it there. A note about this: the first time I stenciled the sweatshirt, I used some sort of temporary spray adhesive that worked great and the stencil turned out perfectly. I couldn’t find it at the store this time and the guy recommended just using push pins. Needless to say, go with the spray if you can find it: way easier, less time-consuming, and better results. I am going to give that guy a piece of my mind if I ever see him again.

image6

Here are the two stencils pinned down with 8 million stick pins. The pins worked OK but were not ideal.

Once the stencils were pinned down, I used one of those cheap foam brushes to dab on the paint. I just mixed blue and black craft paints that I already had to make the navy color I was looking for. #resourceful. Unsurprisingly, the pins got in the way (and had to be tossed after), another reason the spray adhesive would have worked better.

image8

Painted but before the big reveal.

But it still turned out pretty well! The fact that the paint seeped under the stencil a little actually kind of gave it character and made it look not-so-perfect, in a good way (or so say I when I’m justifying why it’s not perfect). But, baby, it’s perfect to me.

image1

The finished product. Imagine me on the floor of the coffee shop taking these pictures to get the full visual.

The good news is that the design is actually legible, and I can reuse the stencil again and slap something on top of this if I decide that I hate it. But I think I like it. It’s growing on me! They may take my life, but they’ll never take my STENCILSSSS!

The Weekend Antique Hall: The I-Deserve-This Birthday Edition

When your birthday lands on a Saturday and you need to kill time so you don’t start drinking at 11 AM, you treat yoself to some antiquing! I can’t believe how long it’s actually been since I’ve gone. So long so that my favorite antique store somehow managed to move their 8 billion pounds of tchotchkes to a new location. A visit was well overdue and my birthday seemed like the perfect occasion to break all my money-saving resolutions. Now, onto the good stuff.

First up: four vintage London postcards. Some of them even have old-timey cursive writing that I can’t read on the backs! I’m thinking I’ll frame three of them or put them all into a collage of some sort. At $1 each, I’d say these were quite the bargain.

image6

Fun fact: at one point in time, the Queen had non-white hair! Who knew?

Next, I found a small globe to add to my growing collection. I thought the size and color of this one made it unique and, at $16, who could resist this (self-given) birthday present? I couldn’t. I physically and literally could not stop myself from buying this.

image5

The fifth globe child in the family.

image4

Here’s a gratuitous bonus shot of the globe and all its mates on the great globe shelf.

FLAG TIME. I know, I know, it’s the wrong country. Of course I wish it were a British flag, but I like the U.S.A. too, guys. I even live there. For now. I might just have to relegate this one to another less-Englandy room so there’s no conflict of interest. It is a pretty cool flag, though. I don’t think it’s been used, but the colors are worn so that it looks good and vintage. The flag set me back the most that day at $24.

image3

U.S.A.! U.S.A.!

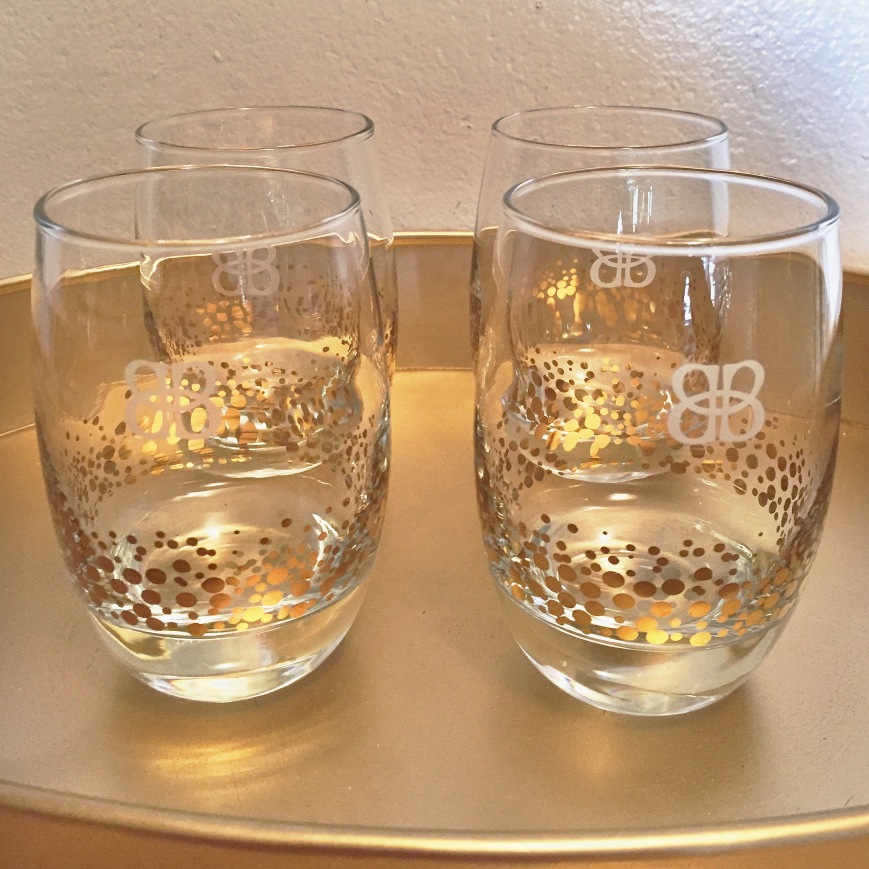
Lastly, I found a whole gaggle of these cute “B” glasses and got four of them. I couldn’t resist since they already had my initial on them, the gold goes perfectly with my bar cart, and the polka dots were so dang cute (and reminiscent of Kate Spade’s style, I think). They’re the perfect size for wine or mini cocktails or giant shots. These guys were just $3 a piece. I love finding good vintage stuff that isn’t priced like some 500-year-old relic.

image1

B mine, you glasses.

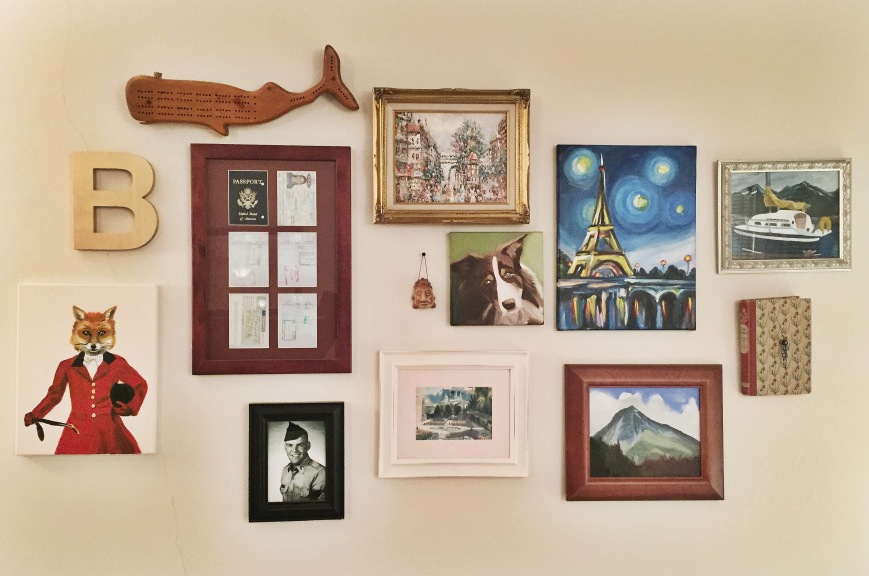
Gallery Wall

It’s been far too long since I posted—apologies to my follower. But now that summer/an active lifestyle is done, I am excited to get back to it! To get into the groove, I’d like to share something I’ve been wanting to post: my gallery wall. I’ve been a fan of this type of setup for awhile and have read (and ignored) lots of tips on how to create your own. And now I’m about to give you tips on how I made mine, so take that with a grain of salt.

My humble gallery wall.

My humble gallery wall.

Please note that I did not intend this to be a shrine to my own artwork but when you’re a. into painting and b. too poor for real art, it happens. Deal with it. I thought I’d mention where the pieces came from and point out some of the vintage or thirty ones BECAUSE IT’S WHAT I DO!

Ms. Foxy: Hardcore fans of my blog (JK, that’s not a thing) will recognize this as a painting I did in my last art class. End of story.

The Golden “B”: The newest addition to the wall! The letter was a few dollars at Target and I spray painted it gold and drilled a hole in the back to hang it. So easy and cheap!

Whale Cribbage Board: A favorite of mine from a local vintage store.

My Passport: Six pages of my passport, separated and framed with a custom-cut mat. Hint: if the coolest stamps are on back-to-back pages, a color copy looks just as good.

My Dad’s Army Photo: My favorite picture of him, because I think he looks like a movie star.

Gold Framed Oil Painting: An original painting of Paris that I got at my favorite antique store by my cabin. Super inexpensive for an original anything.

Mask: A tiny little mask I picked up while volunteering in El Salvador that cost a couple bucks.

Dog painting: My beloved dog Bailey, painted by me.

White Framed Watercolor: This is a painting of the Mirabell Gardens in Salzburg, Austria that I bought from a street artist in the same location.

Eiffel Tower Painting: Another one I did in art class. This one is a copy of another painting.

Wooden Framed Mountain Painting: A painting I did from life (is a mountain alive?) while in Seward, Alaska at a plein air painting weekend.

Silver Framed Boat Painting: Another from the same Seward plein air weekend with a frame from a thrift store.

Vintage Book: A vintage book made into a clock that I bought at a flea market in Brooklyn.

My Humble Advice and Tips:

  1. Mix and match everything. Gold and silver. Black and brown. Homemade and purchased. Photos and other media. Some people go with all photos or all black frames which can look really great, but I love the unmatched look of my wall (and I think it fits my apartment).
  2. Don’t think you have to spend a lot. The most I spent on anything on this wall was probably getting the custom mat for my passport, which was not all that much. Homemade art can look really nice!
  3. Include three-dimensional stuff along with two-dimensional art. It really adds another, well, dimension to the wall. Consider hanging things that aren’t normally meant to be hung. I had to nail a wire to the cribbage board to hang it up, but it’s one of my favorite parts of the wall (and since I don’t know how to play cribbage, no big loss).
  4. Search thrift stores for picture frames. Those can often be the most expensive part, but places like Goodwill are overflowing with them for cheap.