A Hat So Nice, I Knit It Thrice

When you find a good pattern, you stick with it. I love this one from Caron x Pantone by way of Knifty Knittings and decided to make the most of my yarn and experiment with different color arrangements.

In the spirit of using up yarn and chipping away at (or at least not adding to) my giant stash, I thought making three hats from the same yarn would help, but now I just have small amounts of all five colors left. Does anyone’s chihuahua need a winter hat?

These hats are knit in the round and, despite the intricate fair isle pattern, it’s a really quick and easy project. It only took a night to knit one!

Joann Fabrics has these cute faux-fur pompons which work great for the tops. I love this gray hat topper—and it was only a couple bucks! It helps even out the price of the wool yarn from a fancy yarn shop. I am very weak once I enter one of these places…especially when I have in-depth conversations with the owner and spend three hours touching her yarns.

And, if at this point in the blog you’re asking yourself just what does a hat look like on a human head?! Ask no more. I apologize for this, and also you would not believe how many times I attempted retaking it. Cheers to winter!

Crafts & Cocktails

I’m back! And I’m combining my two favorite interests—drinking and crafting. Not to brag but not only is this craft directly related to drinking, I also drank an impressive amount of alcohol while making it.

I’ve been wanting to teach myself to cross-stitch for a while, especially after funny and sarcastic phrases starting getting popular. I know that “I need a drink” seems like it took as much thought as opening a beer, but it beat out about 50 other options I was weighing.

I settled on this phrase because it was funny, 95% of the time true, and nothing I would have to hide when my parents came to my apartment. Then I found this Old-English font with a stitching chart on Pinterest. The font combined with this phrase looked perfect—kinda like all these smarmy phrases showing up on old-fashioned cross-stitch projects. 

Then I made a pattern on Stitch Fiddle. This site is amazing for making your own pattern. It’s like a piece of online graph paper where you can design a color-coded pattern. It was a slow process to count out all the squares and spacing, but it’s much easier than counting the minuscule squares on the fabric. Hot tip: don’t forget to add more than one column of squares between words. This is a lesson the lack of space between “I” and “need” will never let me forget.

Overall, this was a fun project that was easy to teach myself and customize to say anything. It doesn’t hurt that the sum total of supplies was about $5.

And here’s an unrelated bonus: my gallery wall, 2.0! I’ve been busy starting a new job and moving states and apartments lately, so it feels like home again to get this back up on the wall.


My Dream Living Room

Apparently once you hit a certain age, you actually imagine what your dream living room would look like. I had never been interested in decorating until I lived in my “own” (rented) place for a few years and realized that plain walls and generic decor made me miserable. So why is my dream living room on my DIY blog? Because my dream living room simply has to be a do-it-yourself endeavor. I can’t say my current space fulfills my wildest dreams, but I love it. Yes, I actually love my small, characterless, cookie-cutter, month-to-month apartment’s living room, and that’s because I put a lot of time, effort and thought (sometimes—overthinking can be overrated) into it. And after that process, I’ve figured out that my dream living room isn’t a clear, concrete picture just yet (and it’s always changing), but it has some essential elements that, combined together, make me happy.


Something Homemade

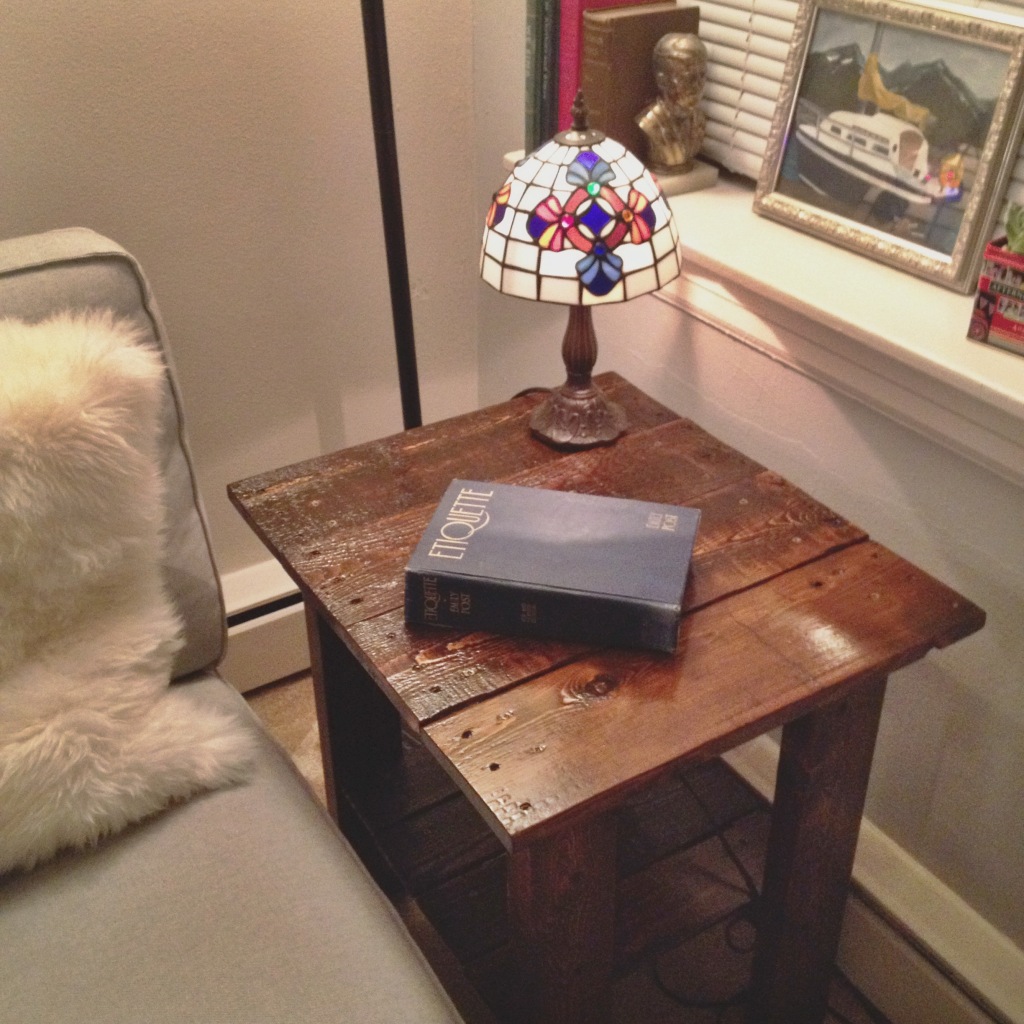
I mean, I do have a DIY blog after all. Besides the value factor (which is awesome), I love making things for my apartment (like this pallet table!) and having something that no one else does. Even if I imitate something I’ve seen, I love knowing that no one else has the exact same item as I do. Also, if you’ve never experienced it, there is nothing better than replying “I made it!” when someone asks where you got something (Note: this also applies to clothing, but then people will ask if you’ve made everything you wear for a week afterwards.).

Something Vintage

In the above picture, the statue, wooden crate, chair, foot stool, books, stamp, and slide are all vintage. And then there’s stuff from Target and Amazon. It’s so much easier than it seems to mix modern with vintage and expensive with cheap. Just make sure everything is your style. And vintage and antique items do not have to be expensive by any means. Curated antique stores can be pricy but flea markets, rummage sales, and second-hand stores usually aren’t. Plus, vintage stuff is super unique, something that has become more important to me. I want my living room to look as good as an IKEA ad; not identical to it.

Vintage and antique accents like this also elevate a room’s look when they’re done well. With an oversized, comfy couch, I was afraid it would be hard to make my living room still look classy but adding these pieces really helps. A well-placed globe, decorative rug, or stained glass lamp can do wonders! (Arhaus has really great inspiration for how to style an elegant living room with big, cozy furniture, too!)

Something That Doesn’t “Go”

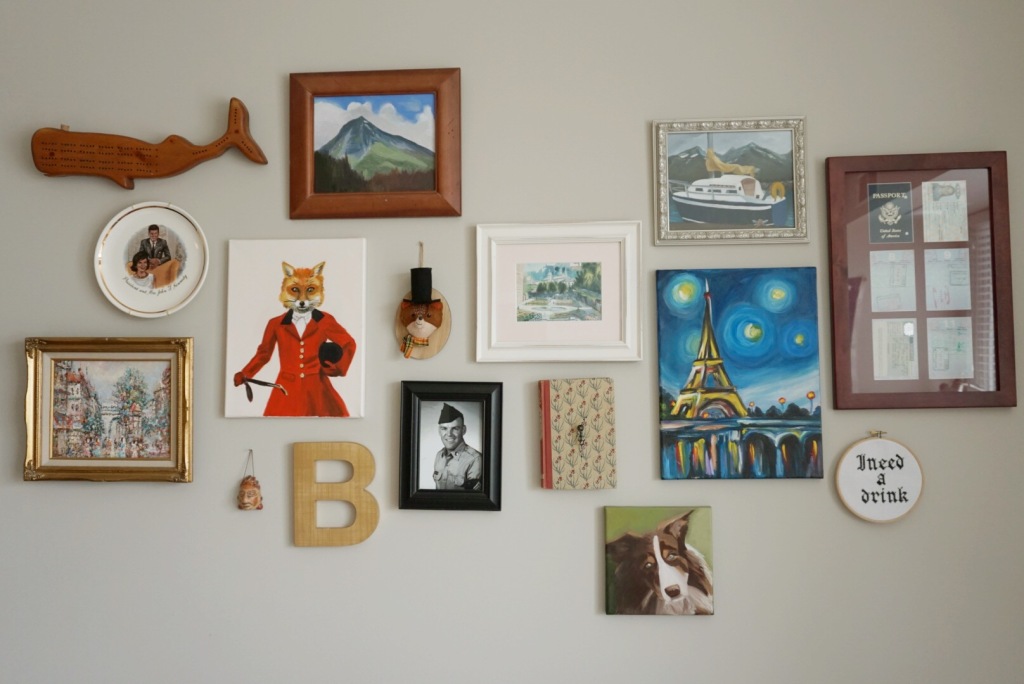
I used to worry about nailing down my colors and style. Then I realized it doesn’t matter, and I can do whatever I want. I could never decide on my color scheme, so I just bought a neutral couch and added things I like. Nothing else in my apartment was as expensive as the couch and can prettily easily be swapped out down the road. I also know nothing about period furniture so I bought whatever I liked. The same applied to my gallery wall. I know some people lay theirs out prior, but I didn’t plan a thing. I nailed up some paintings, photos, and other weird stuff I liked (like a vintage cribbage board, an old book that was turned into a clock, and a clay sculpture that I bought in El Salvador), and added to it whenever I found something else. And I love how it looks. My living room is colorful, eclectic, a little messy, but fun—just like me! No one person has just one style so why not represent everything you love?!
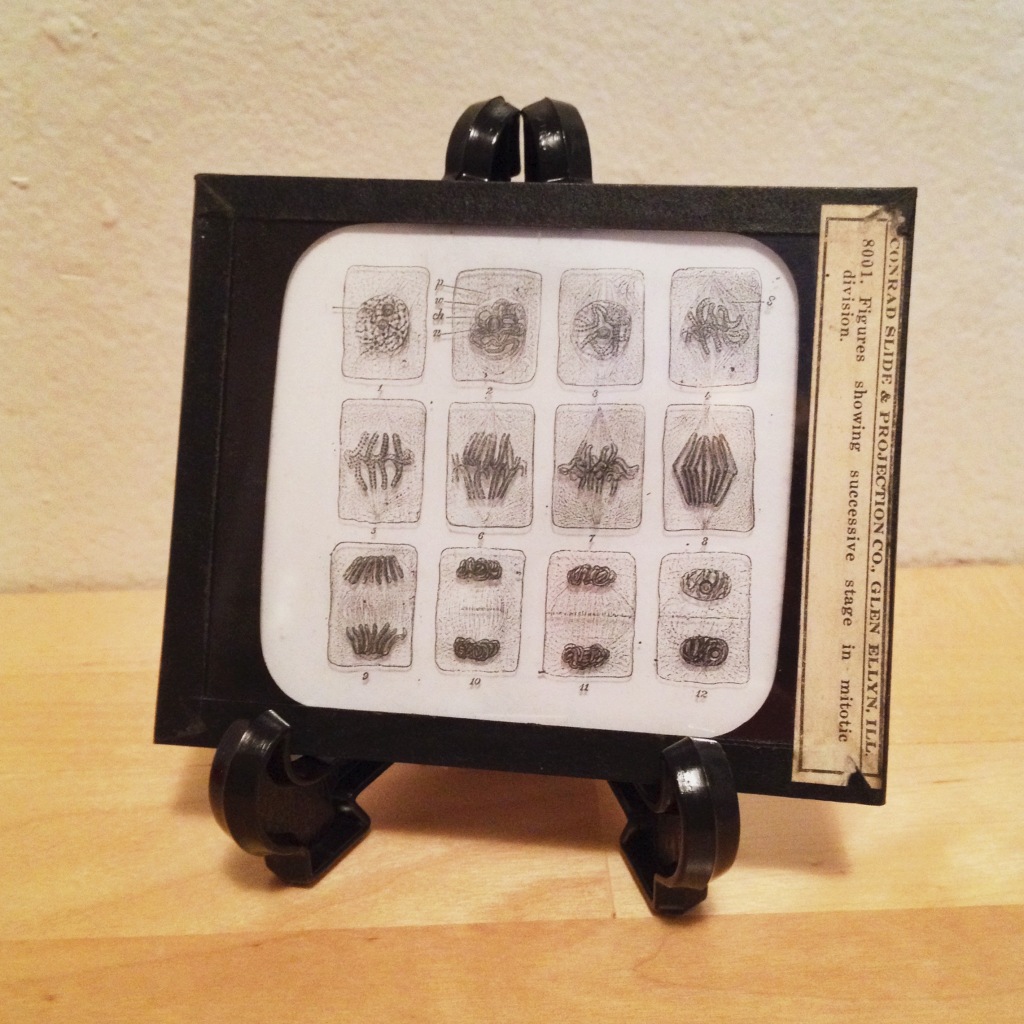
Something Quirky

You know when you want to buy something but have no idea where you’re going to put it? Buy it anyway. (Also maybe don’t take advice from me, because I just bought a $150 fascinator.) For some reason, this vintage slide of a cell process spoke to me. Don’t ask my why, but I liked it and bought it and had absolutely no place to put it. Now, after moving it to about 6 different places in a year, it sits on my new favorite table on some old books and it fits there perfectly. If there is a piece you love and you know it will add something to your living room (and it’s not going to break the bank), get it. You’ll find a place for it eventually.

And in case you’re wondering what my DREAM living room is, it’s something like an English library/country club/sitting room/lounge. The kind with lots of dark wood, leather, antlers, paintings of horses, and shelves of books. And yes, I will start smoking cigars on the reg when I finally have it. Also it magically converts into a Martha’s Vineyard/Cape Cod summer cottage for the warm months. You know, something simple like that.

A Sunny Yellow RepliKate Shirtdress

I always try to downplay the impressiveness of my sewing projects because, really, they’re just following instructions from a pattern. However, this one turned out exactly how I wanted it to, so I’ll take a bow. And not so much for how well it turned out but for how close I got to what I was trying to achieve.

Yes, of course it was another repliKate (a Kate Middleton replica for anyone that hasn’t met me).

Image via Getty

I don’t know why it took me so long with my fondness for sewing and repliKates (I’ve also knit a shawl and sewn a cape similar to hers) to attempt making a dress. Not too long ago, I even made a couple shirtdresses that only took a day so I figured I could manage it. Also, call me stuck in the past, but I think shirtdresses are just the absolute perfect summer outfit, whether it’s 1960 or 2017.

I made this dress with Butterick pattern #6333 and an inexpensive bright yellow (obviously) cotton fabric from Joann Fabrics. The entire dress probably cost less than $20. Thankfully the pattern was really close to the Jaeger dress because I was not too confident I could merge two patterns together like I thought I was going to have to do.

In total, it took just a weekend (fueled by White Claws) to make. Side note: I never know how to answer the question of how long something takes me to make. Yes, it took about a weekend from start to finish (and under a slight deadline), but if I felt like dedicating an entire day to it, I could have done it. That’s also if my poor back did not hurt and I didn’t have to take alcohol and cheese breaks. What a workout!

This also seems like a good time to point out that the dress HAS POCKETS. Heavenly, amiright, ladies?

The pleats were one intimidating factor of this pattern, mainly because I have never done those before. And I am here to spread the good news—they’re easy! I’m super excited with how it turned out, because I think it looks so much like Kate’s. Also I really like the sleeves, which I was worried about. I cannot pull off cap sleeves, but these were just long enough to be considered cap sleeves, while not totally accentuating my arm pit obesity. Hooray!

The results are in: I wore it on one of the first nice days and got lots of compliments at work (and a few renditions of “You Are My Sunshine”, for what that’s worth). Happy spring!

DIY Mid-Century Style Beer Crate Side Table

Every once in a while one of my (many) project failures turns into an unexpected success.

I originally started out staining a smaller wooden crate in which I received some cheese I won (I know, I’m the luckiest girl alive) to make into a side table. All was going well until I tried to attach the hairpin legs that I ordered and found that their bases were too wide to even fit onto the box itself. Since all of my messier projects are done at my parents’, I scavenged around to find something else I could attach the legs to.

img_9875

I remembered an old wooden Pabst Blue Ribbon crate that used to hold firewood at our house and dug it out of the garage. After dumping out the wood scraps and cleaning the dust off, it was the exact style I was looking for, right down to the “Blue Ribbon” stamp on the side and the circular bottle marks worn onto it—and, more importantly, the perfect size for attaching the hairpin legs!

img_9874

I gave the crate a cleaning and a couple of coats of stain. After shaving down the length of the screws so they wouldn’t poke through onto what would become the bottom shelf (another perk of doing projects at home since I don’t exactly have a sawzall in my apartment—thanks, Dad!), the legs attached easily and I had a new-old table! 

img_9873

I absolutely love how this table turned out. From the size to the color to the beer theme, it was the perfect thing to use (and much better than the one I originally intended on using).

img_9870

It fits right into my apartment and is the perfect scale for a small space. I wasn’t sure what I would use it for, but it’s been working great to hold photo albums and assorted tchotchkes I want to display (like my antique mitochondria slide, duh).

img_9871

DIY Christmas Ornaments

Well darned if I didn’t get into the holiday spirit this year! Or, more likely, looking at my sad, tiny fake tree with 5 ornaments on it was so depressing that I had to do something about it. Instead of retrieving the thousands of ornaments stashed away at my parents’ house waiting for me, I figured I’d make some more to add to the pile.

I found some patterns and ideas on Pinterest, naturally (they’re all pinned on my DIY board).

img_9039

Know anyone with two tiny hands and an even tinier head?

These tiny mittens (pattern here) and hat (steps here) just turned out so cute! And the best part was that they were so fast and easy to make (as opposed to some of my year-long adult-sized projects). The mittens probably took an hour each and the hat was even faster. These were also ideal for using up scraps of leftover yarn—I didn’t have to buy anything.

img_9041

Oh Christmas tree, oh Christmas tree, how fake are your branches.

img_9042

This one came within an inch of running out of yarn. DRAMA.

img_9043

P.S. There’s a piece of toilet paper tube under there.

I had been on the hunt at Goodwill for a Scrabble set with the original wooden letters for so long that once I finally found one, I forgot what I wanted it for. So I’ve had a bag of the letters sitting around for a couple of years, and I finally put them to good use!

img_9040

Guess which one is my favorite.

These were super easy to make. I just hot glued the letters together and glued a piece of ribbon to the back. Again, a project where I didn’t have to buy anything—hooray! The only thing I don’t love is that the hot glue can look a little goopy in between the letters, so I think if I made them again, I’d use wood glue.

img_9044

Snow day vibes.

img_9045

Be careful who you give this to. You don’t want people to think you’re calling them fat.

img_9049

It had to be done.

Merry Christmas & happy holidays (sung to the tune of the ‘N Sync song, of course)!

Cape Town, USA

Dear capes, have I told you lately that I love you? The best part about capes, other than their inherent awesomeness, is that they are worn during the best season of the year—fall! In this state, there are basically two days of the year when it’s not too hot or too cold to wear a cape and now that I have sewn a second one, I never have to wear the same one twice in a calendar year. #blessed

Based on this imperial evidence proving that capes are the best, I decided I had to have the cape Kate Middleton has from Zara. Of course, it’s long sold out so I sewed my own repliKate (repliCape?).

kate-midletton-zara-cape

Kate’s Cape from Zara

I used Burda Young pattern #7313 for the cape, as seen below.

img_8470

Burda Pattern #7313. Please note this is a “young” pattern, confirming that I am still young myself.

I couldn’t find the perfect fabric with a large plaid or check like the Zara cape so I settled on this small, brown tweed plaid. It was in the suiting section so it’s a thin but warm fabric, which is ideal. I was excited to find the leather buckle for the top of the cape—I think it looks almost exactly like the original!

img_8471

The before picture, just in case it turned out like garbage, I could still always remember the pretty fabric and the hope of what could have been.

I ran into a couple hiccups along the way. Mainly, I think the pattern called for a fleece fabric or something that didn’t fray when it was cut. When I made the front slits in the cape, there were no instructions to finish the edges. So after a few phone calls to Mom, I improvised by adding dark brown bias tape to the edges of the slits, which I ended up loving because of the contrast and interest it added. I also overlapped the top edges by a few inches when I sewed on the buckle, instead of having the edges just meet when buckled, so it stayed more closed and warm. I’m practical over everything.

img_8467

The only thing I can’t figure out about this cape is how to hold my arms non-awkwardly.

The cape only took a few hours and two nights to finish, and I was ready for a fall photo shoot! I even ate a big lunch so I could repliKate the baby bump Kate sported with her cape. Anything for authenticity.

img_8468

If you think this is awkward, you should see the outtakes.

It was surprisingly hard to find a pattern for this simple cape so I would love to see any others people have found! Capes forever!

img_8469

Chilling by a tree. Told you it was perfect for fall.

A Kate Middleton-Inspired Knit Shawl

I’m a bit of a Kate Middleton fan, but I hide it really well by trying to dress like her always and writing for a Kate Middleton style fan blog in my free time (it’s actually really good and you should read What Would Kate Do? every single day!). For my most recent blog post, I decided to combine interests and knit myself a replica item of Kate’s (or repliKate, as we in the know call it): a knit green shawl she was photographed wearing to the grocery store a couple of years ago.

PIC BRUCE ADAMS / COPY SCHLESINGER - 5.5.11 NEWLY MARRIED DUCHESS OF CAMBRIDGE KATE MIDDLETON WITH SHOPPING AT THE MENAI BRIDGE BRANCH OF WAITROSE SUPERMARKET, ANGLESEY.

Via Bruce Adams, Daily Mail

The clincher? I found this replica pattern of the exact shawl by Cat Wong on Ravelry!

img_0694_medium2

Via Cat Wong, Ravelry

It started super easy and I was like, oh yeah girl, you’ve got this. Cruisin’ USA, right? But since triangles start small at one point and then get larger towards the opposite side, each consecutive row took longer to knit. (I realize this is an obvious fact, but it really took me by surprise, so if I can help one person, this PSA is worth it.) But after some late nights and sore arms (don’t laugh), I finished it!

img_7841

Overall, the pattern was pretty easy to follow (just a little time-consuming) and turned out really great. There are a few different pattern options for the ruffle. As opposed to Kate’s, with ruffles on all three edges, I toned it down and just added the ruffles on two edges of the shawl.

img_7840

I’m also a fan of how this can be worn as a shawl or a scarf or a wrap. The possibilities are endless if endless equals three possibilities!

img_7839

Please give me a haircut someone.

Men’s Gray Knit Scarf

image2

Little does he know, Mark’s modeling career is just getting started.

Call me the commissioner of the league because yo girl got another commish. This time, the item requested was a men’s scarf (which actually may still be usable in May in the Midwest). I picked a simple but interestingly patterned men’s scarf in dark gray (because men can’t wear colorful colors, duh). While the pattern itself was simple enough, the small needles and smallish-sized yarn meant it took a really long time to knit.

Despite that, it turned out pretty great! I think this may be one of my least flawed pieces to date. Usually some sort of mistake sneaks its way in (just don’t look too close). Farewell dear scarf, you’re off to a new home, which is fine by me because I never want to see the same 10 rows I knit a thousand times again.

image1

St. Patrick’s Day Beer Coozies

IMG_4982

A trio of St. Paddy’s Day coozies (and just in the nick of time).

You didn’t think I’d let my second favorite holiday pass without a theme project, did you? Well, I might in the future because these were a lot harder than they seemed. There’s not one of these that I didn’t have to restart at least once. I should probably be hiding that fact but, hey, I’ve had a couple of beers so let’s get real with each other.

First of all, I could not find a pattern for exactly what I wanted. You’d think there would be lots of other people with Venn diagrams of interests where knitting and beer overlapped, but I guess not. For the bottle coozie, I based it off of this pattern, adding in the stripes. This one worked out pretty well but I had to restart it after I realized that using the amount of stitches it said to cast on, it was gigantic (more like wine bottle size). I adjusted it from 56 stitches to 34.

IMG_4983

Bottle coozie in Irish colors.

The next coozie turned out pretty well, at least compared to the first one. I adjusted the same pattern for the size of the can by measuring and multiplying stitches per inch. Stay in school, kids. Algebra is real life. Turns out checking gauge is actually a pretty good idea! Note for the future.

IMG_4984

The Irish flag coozie.

This next one was what I intended to do all along and had to work my way up to. While I knit the others in the round, I could not figure out how to get the intarsia clover pattern in there at the same time and ended up starting over. I knit it flat and then sewed it together up the seam. It turned out being much taller than I intended and also don’t look at the lower right leaf. I don’t know what happened there. I’m not even sure if this counts as a beer coozie. Any idea what else it could be? Whiskey bottle coozie? Arm band? Garbage?

IMG_4985

The fancy one. Hey, I tried.

I would say I’ll be making this next year but after these projects…maybe I’ll just stick to drinking beer. Happy St. Patrick’s Day everyone! Cheers!